Thursday 29 October 2015

Previous Clear Cast Resin

In the previous project I had explored the properties of Kleer Kast Resin. I had the idea of casting my hair in it and then plaiting the hair into a necklace with the resin part being a pendant of sorts.

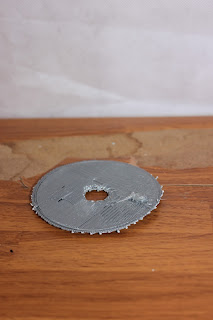
Here is how my hair cast experiment turned out. For the mould I used home made play dough with the flat surface exposed to the air.


The hair and resin experiment took a long time to dry and be touchable. This may have been as a result of the dough it was cast in.
The hair was also difficult to work with as the strands went in all directions and I did not have the patience to sort them neatly.


One of my other interests in casting was to create replica Lego pieces. I tried first with sealing wax, then with solder, and finally with resin.
This also took a long time to set, but the result was quite nice, the flexibility of the dough meant that there was a small amount of warping and some of the dough has stuck to the piece, but above all else it looks like a piece that could be used.

Wednesday 28 October 2015

Shaktiquaver

Here is my final submission for this course, as well as for my undergraduate degree.


The title of the my object is Shaktiquaver

In making Shaktiquaver I wanted to produce something that was both mechanical and painful in appearance, but pleasing to the touch.
I also wanted to reflect upon the materiality of the plastic cast which many perceive as wastage.

The name comes from the words:
Shakti, which means Bed of nails
and
Quaver, which means To Shake, quiver, or tremble

Shakti also means Energy, Power, Creativity, Compassion.
The energy and power of the circuit creates a connetic movement through a creative form. The appearance of my object is mechanical and painful and when the user discovers the sensuous touch it makes they can feel compassion towards the object for their preconceived feelings towards it.

My final image that I have chosen. It shows off the intricacies of both the 3D print and the wires, and blurs the details of the plastic base.

Above is a creative interpretation of the shapes, and movement of my model. Emphasis is on the twists of the wire structures, the harsh sharpness of the above wire forms, the blurred texture of the plastic shapes and the hexagonal form that dominates the wire arangement.

Above is my final video. In which I tried to show the hidden side of my object, something that is playful and pleasing to the touch, contrasting with its painful and mechanical appearance.

Below are the video credits.

Shaktiquaver

Emotive Physicality

Project 3
DSDN 141
2015

Jayden Hamilton

Victoria University of Wellington
School of Design

Machine Elves by Alan Singley is 
licensed under a Attribution-
NonCommercial 3.0 
http://freemusicarchive.org/

Friday 23 October 2015

3D prints, getting the hang of it.

I decide to create a small piece using the 3D printer rather than a large cage. As it was a requirement I only needed to tick the box of having it there, but I realized that starting small is the best thing when 3D printing as you get that instant feeling of satisfaction when your print is successful and that only encourages you to try again and again.

I spent the morning at Uni and managed to get five prints done. The first one was too big and the holes throughout it were 1.5mm rather than the 1 that fit snug so I redrew my design and got to printing. At the same time I was using the workshop to recreate my circular mould for the cylindrical plastic piece.

Even now the novelty hasn't worn off that a machine made this stuff under my instruction. Even now I can appreciate that the rafts that I have been given which I cannot use currently were created by the machine with their sole purpose being to support. I still think though, that to be able to recycle them, whether that is turning them back into filament or melting them down as I have my other plastics.

Food for thought eh?


Wednesday 21 October 2015

More plastic movement experiments.


These are merely the pieces of wood that are cut out when using a circular drill bit, however, when melting plastic it is a good idea to have something pushing down into the mould, so reusing these is a brilliant idea.


And here is the mould itself. I used this one a couple of times, if the plastic is done perfectly, melted well and formed into a full cylinder but not overcooked and burnt enough to ruin the plastic, it should pop out easily with a few taps of a hammer. perfect.


This mock-up tried to make physical one of my ideas I had sketched up, using one motor to spin several dowels. The frame worked well, using a few pieces of duct tape held it all together, but rubber bands didnt want to work for me and I didn't know what else would.

This here is just an off cut from when I truncated another cylinder. It could be used again to form another shape.


When you have melted a batch of plastic but all of your main moulds are full, instead of letting it set to the inside of a pot you should use it up by setting it in another mould. Here I have made a couple of patties by setting the leftovers in a large flat mould.


This piece is small, but has some nice features like the corrugations of the wood that was used to press down upon it. The orange colour is from a bottle cap and makes for a neat marbled colour.

Tuesday 20 October 2015

Concept Sketches

The following is a collection of my sketches for ideas of moving parts involving a simple motor.
Above: the motor will share the rotation with some dowels via rubber bands or similar. Attached is a band with different length metal pieces on it. Each piece will make a different noise as it hits something as it goes around,

One motor is powering the rotation of several dowels with fans or windmill like structures attached  to them.

The motor turns a large truncated cylinder which in turn makes the wires rise and fall through the top piece.


One motor makes four dowels spin in different places in the shape of a cross.
Similar to the previous one; the motor seperates its energy into four parts of a cross. This time, with pencils or pens. Each point of the cross will have a point of the pencil on the paper below. as it spins it will create different textures.


A rack of different dowels that will spin and create sound as the metal strips on their ends come into contact with something, maybe one another.

Thursday 15 October 2015

Explore 3D Printing

Below is my first ever attempt at a 3D print. a pretty exciting feat, even if it is just the raft of a failed object.


As I was new to 3D printing during this course, I had to learn both the digital modeling software as well as the printing machines. The software I was using was actually very easy. I used 123D to create a shape and another program to send it to the printer.

All very exciting.

I had a couple more attempts but all I came up with were failures. I couldn't even make a raft that stuck to the printer.
However, they were my failures; and I'll love them,


I decided to stop what I was doing and print something smaller. The brief only said I needed to have a part of my object printed, it didn't have to be the center of attention. I figured out which printers were likely to successfully print something and began to work on a couple of smaller objects.

Success.


Below is my first successful print. I had an idea that I could print one long cylindrical piece that had groovy rings cut into it and then judging on what I required I could just cut them off at the right size accordingly (I still think very much with hand tools) But it is probably just quicker to print several of the same thing when you need it.
I might get my head around not having all of the stuff readily accessible, rather, using the printer to make what you want a couple of hours before you need it.

So for a first print its kinda cute, I even butchered it a little bit trying to get the protective framework off. There, it has personality.

Tuesday 13 October 2015

Plastic mockup

For my 21st birthday a year ago I was gifted a bunch of screens and a stand for them; recently I've become near addicted to the Ryobi power tool range, I purchased an amazing white light; therefore I pretty much have my own photography booth ready to set up when I need it.


I continued with my melting of recycled plastic, this time hollowing out a fence post as a circular mould. this was rather laborious with a handheld drill. 
I smacked it out with a hammer and sanded it down a bit. It looked mostly pretty good.


With a second less perfect piece I was able to saw off the excess on an angle so that I had a smooth truncated cylinder. (albeit with a few air bubble holes in it).
This was the start of my idea for a final form that had moving parts involved.
I want to hollow out the main plastic cylinder enough to house the electrical components, then I want to build a wire frame to hold a 3D printed piece above. In between a truncated cylinder will spin around. On top of this  will be numerous wires that will bob up and down in a controlled manner with the spinning.


Seen here, is the two plastic pieces, connected by the motor which is hiding in a hollow.